| Contents |
Setting up permissions on your server allows specific users access to different commands of your choice. You can set up Admins, Mods, and normal user command levels. We will have a few sections in this Knowledge Base Article to help you with all of these.
How To Setup Users:
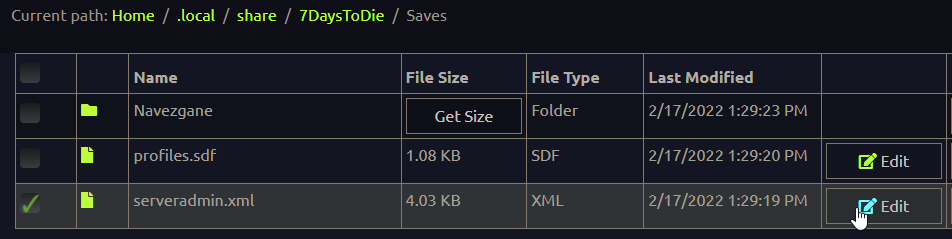
You can set admins with all permissions using this guide. For regular users, you will start by going to the saves folder of your FTP to find the "serveradmin.xml". This is the file location: /.local/share/7DaysToDie/Saves/serveradmin.xml/
These steps are also detailed in the serveradmin.xml for you to reference.
- Once you have found this file, select the "Edit" option in the middle right. You can now modify the file.
- You will need to find the section "</admins>" within this file and start a new line below it. Paste the following on that line:
-
<user steamID="STEAM64ID" name="AnyName" permission_level="0" />
-
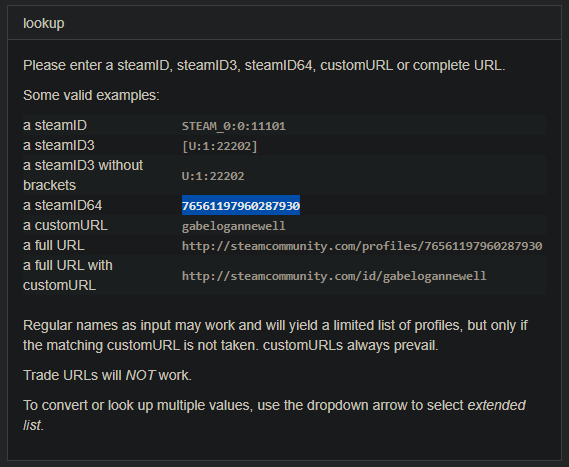
- Replace the STEAM64_ID with the player's Steam64ID of which you wish to be admin. You can use SteamIO to locate a player's Steam64ID!
- You can set the "name=" to anything you like, this is displayed only to help you identify the user in this file.
- You can now set a permission level for the player. Setting this to 0 will give the player all permissions, see the "How to setup Permissions" section to learn how this works to set another number.
- Once done, at the bottom click "Save/Exit" and restart your server to apply the changes!
How to Setup Groups:
To give permissions to an entire steam group you will first need to get the link to that group's steam page. In this example, I will use the Steam Universe group provided in the serveradmin.xml: https://steamcommunity.com/groups/steamuniverse
- Again go to your serveradmin.xml within the saves folder of your FTP. Edit the file and find the "</admins>" section. Paste the following in a new line:
-
<group steamID="ID" name="Name" permission_level_default="1" permission_level_mod="0" />
-
- To get a steamID for a group, you will need to open a tab in your browser proceed to the group’s steam link. Once opened, paste the following at the end of the link and press enter:
-
/memberslistxml/?xml=1
-
- While this may all look scary, you simply need to find the “<groupID64>” number near the top of the page. Once you have this, paste it in the “steamID=” part of the group line. Set the name so the name of the group for reference.

- The next part allows you to set the permission level of both the normal members of the steam group and the mods separately. See the "How to setup Permissions" section to learn how this works to set another number.
- Once done, at the bottom click "Save/Exit" and restart your server to apply the changes!
How to Setup Permissions:
- To set up a command permissions start by finding the “<permissions >” part of the serveradmin.xml. Make new like and paste the following;
-
<permission cmd="commandHere" permission_level="0" />
-
- In the “cmd=” section you set the command you want available for users with the permission level lower than or equal to the level set in “permission_level=”.
- You can find a list of commands available on The Official 7 Days to Die wiki here: https://7daystodie.fandom.com/wiki/Command_Console
- The “permission_level=” is used to set what permissions/commands the user has access to. The user will have access to all commands at the set permission level and above. For example, if someone has permission level 5, they have access to 5, 6, 7… and so on.
- Once done, at the bottom click "Save/Exit" and restart your server to apply the changes!
If you experience any issues editing your 7 Days to Die server's settings, please contact our support team for assistance!
 @MCProHosting