Your Minecraft Bedrock Edition server can support custom maps! Custom maps are very important for Minecraft servers, offering the ability to upload existing maps so that you can enjoy custom builds, minigames, custom hubs and spawns, and so much more.
To start, you will want to download the world you want to use. That map must be in .zip format. We would recommend the program WinRAR for this. With WinRAR, right-click the world folder you wish to upload and click "Add to Archive". Set the format to ZIP and then press OK. You have now successfully put your world folder into a .zip format.
To upload a world to your server:
1. Go on your server's control panel and stop your server.
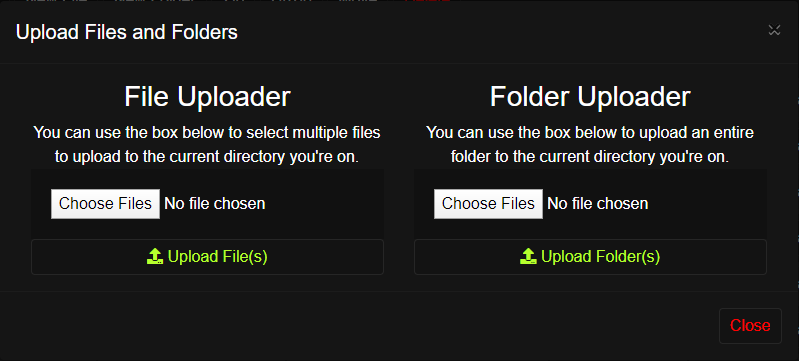
2. On your control panel, click FTP File Access.
3. In your FTP File Access and enter the Worlds folder.
4. While in the Worlds folder, click the Upload File(s) button and select the map you wish to upload. (As a reminder, that map must be in .zip format. We would recommend the program WinRAR for this. With WinRAR, right-click the world folder you wish to upload and click "Add to Archive". Set the format to ZIP and then press OK. You have now successfully put your world folder into a .zip format.) (For Pocket Edition/Bedrock Edition servers, ensure those worlds are compatible with your server type.)
Please note that when uploading a world in either a .zip or folder format, it must be archived in a certain way. For a .zip file, you will need to ensure that any sub files/folders are contained within a folder before archiving.
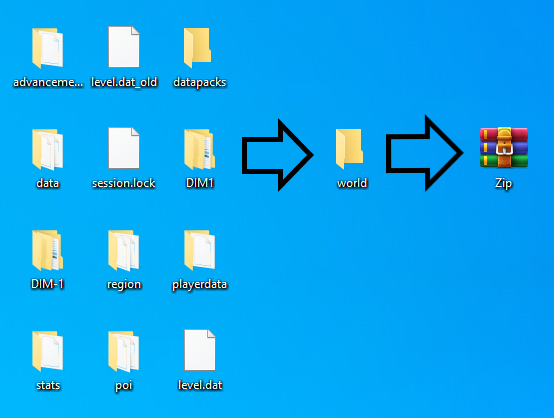
This will make things much easier when it comes to unzipping the file after the upload is complete. For the folder upload option, just ensure that any sub files/folders are contained within one folder. If a world is not archived properly, your world may not work and files/folders will likely need to be moved into the correct directory.
5. Click Upload File to confirm the upload of that map .zip file. Allow that upload to complete.
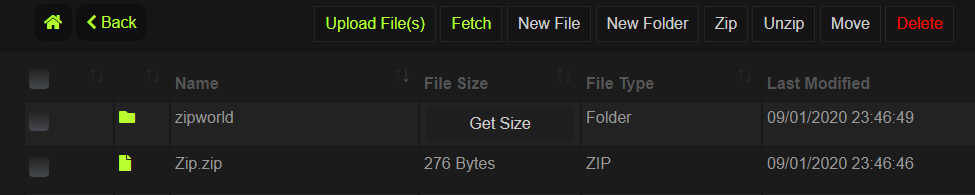
6. Upon completion, locate that map .zip file in your FTP. Select that file by selecting the checkbox next to it.
7. After selecting that map .zip file, click Unzip at the top of your FTP File Access.

8. The map will now proceed to unzip. Allow this to fully finish to ensure your map finishes unpacking.
9. Now, click < Back to go back to the main directory of your FTP and click to edit the server.properties file.
10. In the server.properties file, locate the level-name= setting and set this to the name of the world you uploaded. If the world was named "skyblock_adventures", you would set this setting to level-name=skyblock_adventures.
11. Click Save changes to save those changes and then exit your server's FTP.
12. Lastly, start your server and your server will now load that world!
You have now successfully loaded that world to your Minecraft server!
Need assistance with adding a world? Submit a ticket to our General Support department and we can help you!
 @MCProHosting